环境配置
点击查看详情
环境配置:debun 11 & 2核(vCPU) 2 GiB 3 Mbps
创建博客存放的目录
例如,存放在 /home/www/hexo
cd /home
mkdir www
cd www
mkdir hexo
|
然后,安装 nginx
// 首先确保系统软件包列表是最新的
sudo apt update

// 使用 apt 包管理器来安装 Nginx
sudo apt install nginx

// 启动
sudo systemctl status nginx
|
配置 nginx 路由:
建立了博客的根目录后,需要将 nginx 服务器指向这个根目录地址,才能访问到博客页面,所以需要修改 nginx 的配置文件。
cd /etc/nginx
ls

// 其中,nginx.conf 就是默认配置文件
|
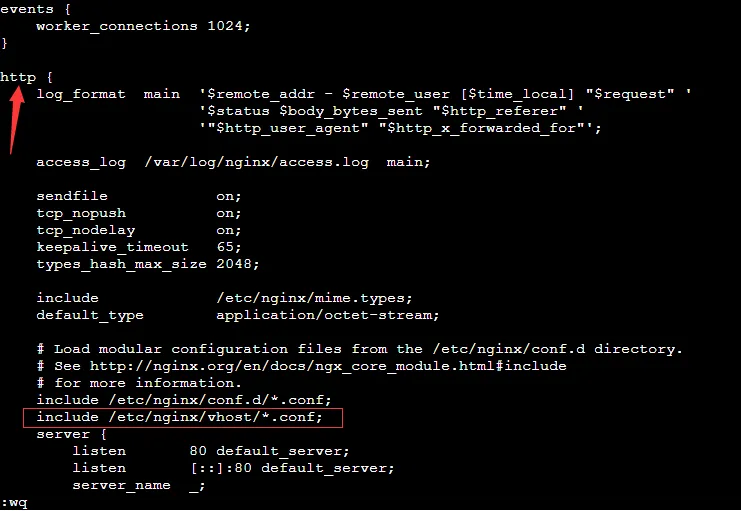
但不采用直接修改 nginx 配置文件的方式,而是新建一个文件夹,将自己的配置写在新建的文件夹中。再利用include,在配置文件nginx.conf中将文件夹引入进来即可。
这样若有新的需求时,只需在文件夹中添加新需求的配置文件即可,不会再次修改配置文件nginx.conf,提高效率。
切换/etc/nginx/目录,在此目录下创建一个文件夹vhost:
cd /etc/nginx
mkdir vhost
cd vhost

// 输入vim blog.conf新建blog.conf文件并编辑内容:
vim blog.conf

server{
				listen    80;
				root /home/www/hexo;
         server_name iooio.cn;
         location /{
         }
}

// 为了让http://www.test.top/也能访问到博客页面
// 再新建一个配置文件wwwblog.conf,将server_name设置为 www.iooio.cn

vim wwwblog.conf
server{
				listen    80;
				root /home/www/hexo;
         server_name iooio.cn;
         location /{
         }
}

// 这样,/etc/nginx/vhost目录下就有两个配置文件,blog.conf和wwwblog.conf;
|
打开/etc/nginx/目录下的nginx.conf文件
// 增加一行代码

vim /etc/nginx/nginx.conf

// 注意,要写在http{}的里面
include /etc/nginx/vhost/*.conf; # 增加这一行代码
|

安装 node.js
点击查看详情
使用 nvm 来安装和管理node
// 安装 nvm
curl -o- https://raw.githubusercontent.com/nvm-sh/nvm/v0.39.1/install.sh | bash

// 需要手动启动一下
source ~/.bashrc

// 即可以安装指定版本的 node.js
nvm install 18
|
安装git & 建立 ssh 信任
点击查看详情
sudo apt install git

//新建一个 git 用户, 并修改它的权限
adduser git
chmod 740 /etc/sudoers

// 打开/etc/sudoers命令:
vi /etc/sudoers

// 添加语句(注意大小写):
git ALL=(ALL) ALL

// 回收文件权限
chmod 400 /etc/sudoers

// 设置一个密码
passwd git
|
然后,切换到 git 用户
su git
cd ~
mkdir .ssh
// 使用 ls -a 即可看到隐藏的 .ssh 文件
ls -a
cd .ssh

// 新建文件, 这个文件吗是定死的,少一个 s 都是不行的
touch authorized_keys
|
现在,使用 fileZilla 将本地 id_rsa.pub 上传至 aliyun .ssh 目录下
// 公钥的内容拷贝到 authorized_key 文件中
cd ~/.ssh
cat id_rsa.pub >> ~/.ssh/authorized_keys
|
看看通不通?
配置 git 仓库
点击查看详情
在服务器上使用git用户创建一个Git仓库,并且在该仓库中新建一个post-receive钩子文件。
cd ~
// 创建一个裸仓库
git init --bare hexo.git
vi ~/hexo.git/hooks/post-receive

// 然后,写入以下代码,即:让钩子文件删除/home/www/hexo目录下原有的文件
// 然后从blog.git仓库 clone 新的博客静态文件到/home/www/hexo目录下。
git --work-tree=/home/www/hexo --git-dir=/home/git/hexo.git checkout -f

// 然后,授予钩子文件可执行权限
chmod +x ~/hexo.git/hooks/post-receive
cd ~
sudo chmod -R 777 /home/www/hexo

// 现在,设置远程仓库的默认分支
cd /home/git/hexo.git
git symbolic-ref HEAD refs/heads/main

// 禁用-删除默认站点配置
sudo rm /etc/nginx/sites-enabled/default

// 重载 Nginx
sudo systemctl reload nginx
|
现在,为项目配置 ssl 证书
点击查看详情
首先,安装 Certbot
// 安装Certbot
sudo apt install certbot python3-certbot-nginx

// 申请
sudo certbot --nginx -d iooio.cn -d www.iooio.cn

// 验证
sudo certbot certificates
|
本地 deploy 推几次试试
看权限是否给到位了 /
hexo d 实现 github & aliyun 双端部署